How to Upload a Sound Recording From Garadeband to Youtube
GarageBand, thankfully, comes equipped with the option to directly convert your completed tracks into both Music and SoundCloud which has proven immeasurably helpful for me.
GarageBand is the first DAW I've ever used, and so I don't know if FL Studios, Logic Pro, and other software come up with this capability, but either way, it's definitely a useful feature.
by the mode, I have a listing of all the best products, coupon codes, and bundles for music production on my recommended products page. The three items that really stand out to me correct now are:
How to upload your music to SoundCloud
This is a simple process. Afterwards you lot've created your music in GarageBand, yous just have to follow a few simple steps.
1) Go into the GarageBand toolbar on the acme of the screen.
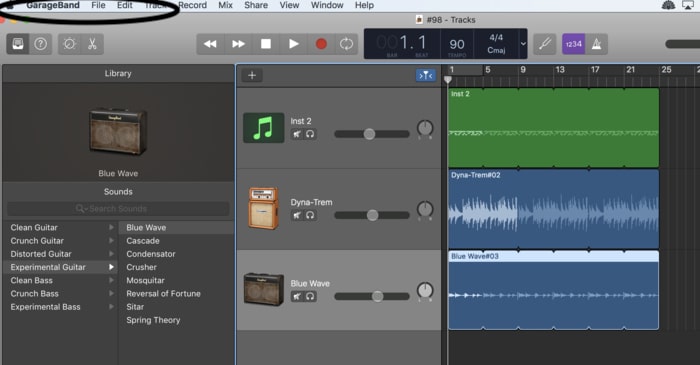
2) Click on the "Share" driblet-down bill of fare.
three) Click on "Vocal to SoundCloud."

iv) After that, GB will bring up a carte with a list of all of the information that you tin type into the menu, including "Title," "Creative person," "Composer," and so on and then forth.
5) Make sure you take the option, "Bounce," selected.

When I upload music to SoundCloud, I usually permit people to both stream and download my tracks for costless.
The mode I wait at it, I'm just happy that someone will want to listen to my music and bask it. Information technology's even meliorate when someone uses it for something, like background music to a video, for a rap beat, or equally a jam rail for when they're practicing the piano (I couldn't recommend Piano For All enough for keyboard learning, past the manner).
I would suggest allowing people to utilize your music for costless, just because when you're first starting out, you want all the exposure and promotion you can perhaps get.
Just enquire people to link your producer/artist/band proper noun in the rails, and most will be more than happy to exercise so.
Dorsum to Uploading…
Now, for whatever reason, sometimes this takes a moment, especially if you have express bandwidth. I suggest doing it in a place where the Wi-Fi is fast.
Having an old computer makes information technology even slower, which is why I recommend a faster and new i like this 2020 MacBook Pro from Amazon.
How to upload music from GarageBand to Music
To upload your music from GarageBand to Music, you have to follow the same process for putting your music on SoundCloud.
1) Get into the GarageBand toolbar on the acme of the screen.
2) Click on the "Share" drop-downwards menu.
3) Click on "Song to Music"

4) After that, GB will bring upward a carte du jour with a list of all of the data that you can type into the card, including "Title," "Artist," "Composer," and then on and so forth.
5) Make sure yous take the option, "Highest Quality" selected.
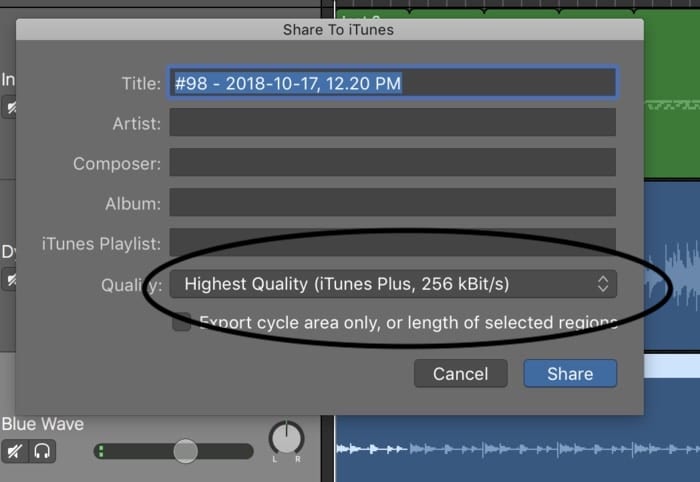
6) And then click "Share."
As I've talked well-nigh earlier in my mixing guide, when I export my music to both Music and Soundcloud, I typically try and accept the master volume set up to between +1.4 – + 1.eight dBs.
This is usually loud enough, and if you've mixed and mastered properly, in that location won't be any crackling or distortion.
Another affair to consider is, to remember to make full out the settings, "Title," "Anthology," and "Composer," because you'll discover that when you upload tracks, sometimes information technology will create more than than one creative person name in your iTunes library.
It was surprisingly annoying for me, because when I uploaded music to Music, sometimes it would create a split up name, even though I was using the same title.
Y'all but have to remember to give your track an anthology title, and it doesn't injure to fill out "Composer" too, that way iTunes registers every track under the appropriate heading.
How do I upload my music to YouTube?
This process is a piddling more sophisticated, but it'due south still pretty unproblematic. You'll likely run into all kinds of little annoying issues, like using a expert prototype that won't get striking with a "copyright" notice, or formatting the epitome that way information technology uploads to YouTube at the proper size.
But we're going to run through all of this today, that mode you don't have to effigy it out the aforementioned way that I had to. There's a lot of videos online that are helpful, but not helpful plenty.
i) Download iMovie, in case you already haven't. Just do that past getting it from the app store for costless. Still, it may just come installed direct on your Mac. I'yard not 100% sure.
Just type in "iMovie" into the search bar and iMovie should be the first one on the superlative-left-hand corner.
By the fashion, this is a great software for people looking to accept their beginning stride into editing. Information technology took me a couple of days to effigy out how to use it properly, merely it all came with time.

ii) Later you've finished your song, upload to Music the manner I described above.
iii) Open Music and select your track.
four) Open iMovie.
v) Later you've opened up iMovie, drag and drop your track into iMovie. Yous should see that your rail is now sitting in the software on the bottom portion of the screen.
Information technology'southward equally simple as dragging and dropping it right into the software. I prefer minimizing the Music screen that style I can but driblet it right in there.

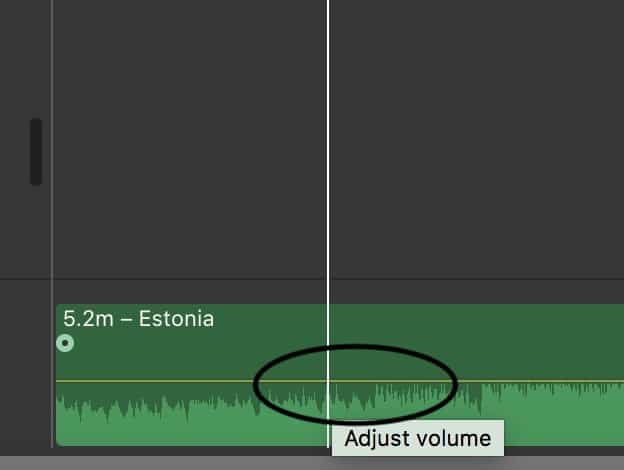
The get-go thing that you'll notice is that the green rail volition show yellow and reddish. That means the runway is clipping (information technology's too loud for iMovie).

6) Use your cursor and select the line on summit of the green track, and drag it down, that way y'all're turning the total volume downwards a fiddling bit.
7) Drag and driblet any image you desire to use into the software, so that it sits correct on top of your music.
A footling tip here: Whenever I notice an image to put into iMovie along with my music, I ordinarily use one of my own pictures.
Or, when I search for images in Google, I go into the "Tools" setting, and select the choice, "Usage Rights," and then, "Labeled For Re-Utilize."
I'm not 100% sure if this is a fully-constructive fashion of avoiding copyright infringement or copy-strikes on YouTube, but it appears to have worked for me thus far.
8) Make sure everything is aligned properly. In other words, y'all want to apply your cursor to stretch out the epitome so that it matches the length of the rail.
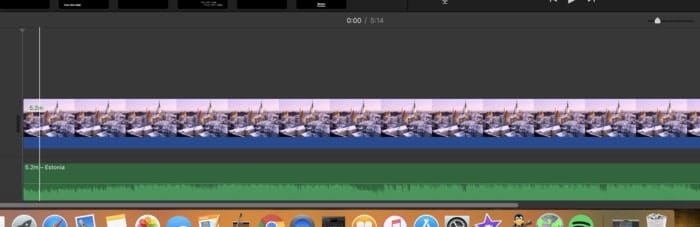
The purpose of this is so your image shows for the entire time your song plays. You do this with the movement where you open up your two fingers up on the trackpad which I've talked about earlier in my editing guide.
It's also chosen the "Zoom In and Zoom Out" control.
At this point, you can do a number of different things, similar drag and drop a "title" from the top bar where it says, "Title," that mode you can write something over top of your paradigm.
I normally just write my producer name.
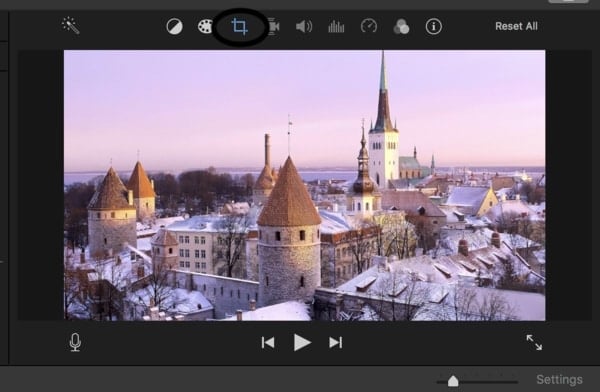
9) After adjustment the paradigm with the track, go to the toolbar higher up the image on the meridian-right-hand side and click on the piffling square.
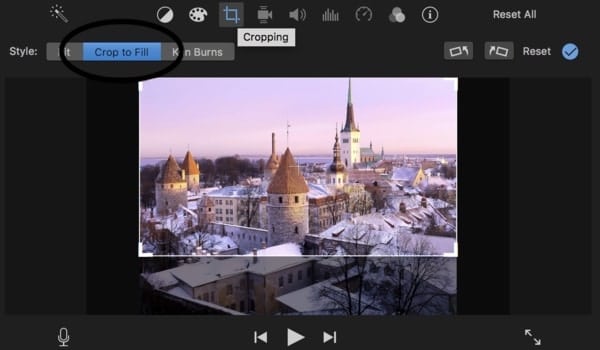
x) Select, "Crop to Fill," and then select the function of the image that you want to show the most in the video, that way it fits the unabridged screen in YouTube.
You don't want one of those videos where the picture show and video don't even take upward the whole screen. Information technology looks unprofessional and lazy.
11) And then become into the iMovie settings, and click on the choice, "File."
12) Get to "Share."
13) And then click on "File" Again.

fourteen) Now, you lot'll see the option for naming your video, and so y'all just export it as "Sound and Video," and brand sure you've selected the "720p threescore" Resolution.
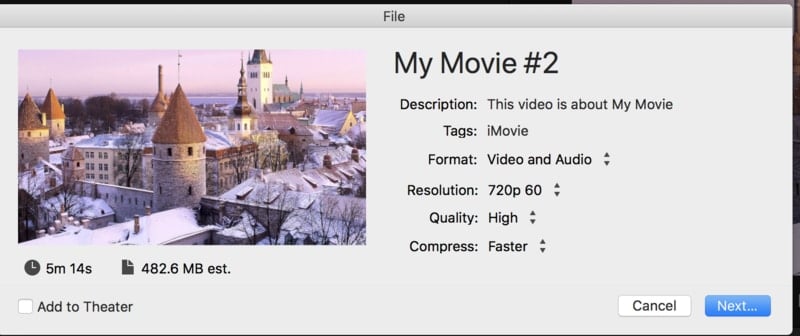
Also, I prefer saving it to my Desktop, that way I tin can just drag and drop it once I'grand done. I don't have to go rooting into my files to find it afterward.
You lot could select the "Pro-Res" version, but that's going to make the file size huge.
If you use, "Pro-Res," a five-infinitesimal vocal could be up to 5GB, which might take far too long to upload to YouTube unless you lot have the patience to expect for it.
Some other option is to share it direct to YouTube through iMovie's setting, just for any reason, this choice doesn't work equally well for me. It ends up uploading my video to YouTube with default settings that I'm not really interested in using.
Anyway, on to the next step.
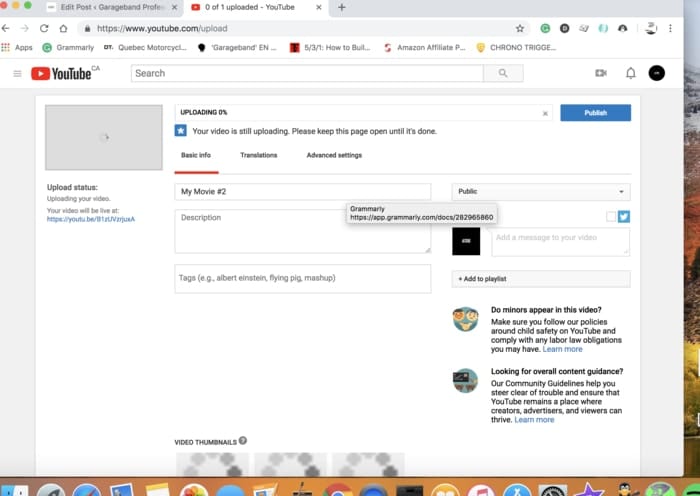
Now that yous've successfully created a music video with one image (or maybe even multiple images), you can drag and drop the file into the YouTube "Upload" page.
15)Open upwards your YouTube account, and go over to where information technology shows a piffling video camera on the top-right-manus side of the screen. When yous click on it, it volition say, "Upload Video."

16) After you just drag and drib your music file into the "Upload Page," y'all can fill up in all of the information on the song.

Write in the clarification about your runway and add the advisable tags.
I'd recommend filling out all of this, especially the description because it will help for SEO purposes.
Another Tip: Another matter to proceed in mind is that you lot should take an advisable championship for your videos/songs.
Don't number them or give them eclectic titles, because YouTube is a search engine, just like Google, and giving your tracks weird titles will brand them impossible to find in YouTube'south search engine.
For instance, telephone call your song, "Estonia," rather than "Track #475."
Conclusion:This is how you upload your music to YouTube. It's a straightforward procedure once yous become the hang of information technology. While YouTube doesn't pay a lot for views, information technology's a smashing way of promoting content and driving traffic to your website, assuming you accept one. Just if this tutorial didn't do it for you lot, I accept a similar 1 here.
How do I upload my music to SoundCloud, iTunes, and YouTube, at a like volume to every other creative person?
This process is pretty simple too.
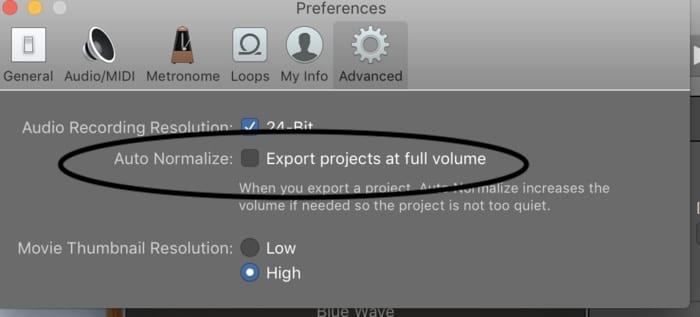
i) Yous but have to go into your GarageBand preferences.
2) Click "Advanced."
iii) Uncheck the box that says, "Automobile-Normalize – Export Projects at Total Book" (more on auto-normalization in my guide).
Now that yous've figured out how to upload tracks to your desired volume-level, yous'll probable run into another problems that volition take you a while to troubleshoot.
Even so, I'g going to run through all of the problems I've encountered over the final twelvemonth, and walk you step-by-step through the process, that way you tin become quality mixes uploaded to your platform of choice.
Information technology takes practice to get it right, but it'southward really kind of fun to mix and master once you've figured out how to brand a track sound skilful.
You're likely to run into issues in this process. I did.
The number i upshot that I faced in the beginning, was distortion in my songs afterward uploading them to Music and SoundCloud.
Information technology turns out, the problem was that I was exporting my songs out of GarageBand at likewise high of a book.
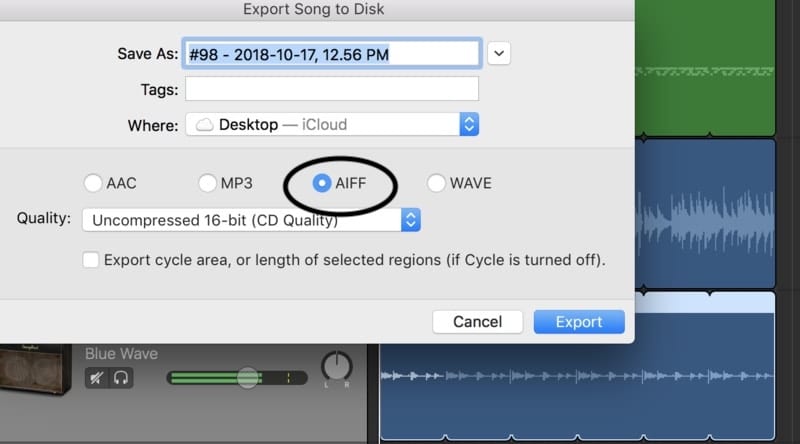
What y'all want to do, is export your song in an "AIFF" file to your desktop. But earlier doing this, make sure none of your book output levels on your track headers (instruments) are going into the ruby-red. That's a bad sign. Another way yous tin can go about this is via a metering plugin from Plugin Boutique like Perception AB.
That means the signal is clipping, and your mixes won't sound skilful when yous've uploaded them to other platforms, whether it's on Music, YouTube, Spotify, or on a CD format for your car.
Additionally, make sure your main output meter, located on the upper-right manus side of the GarageBand software, is not going into the red either when y'all've exported it (as an AIFF file) and re-inserted information technology into the software for mixing and mastering.
If you don't know how to mix and chief, I'll exist writing a simple step-by-pace article on that at a later date, and then stay tuned.
Hither's a footstep-past-footstep process for uploading your music at an advisable volume level.
How To Upload At A Competitive Book Level
Similar I talked about in my guide on why your Garageband songs are and then quiet, before yous consign the vocal as an "AIFF" File, make sure y'all don't have whatsoever Plug-in's running on your primary track, rather than just one of your "Audio" or "Software Instrument" tracks.
This will interfere with the mixing and mastering process later on.
ane)To practise that, just go into the "Smart Control" settings beneath your runway, and you should be able to see where it says, "Plug-Ins."

Make sure you've selected, "Master," that way yous'll analyze the master runway, rather than the Plug-In settings of one specific instrument or audio recording.
When a Plug-In is on, it'll be blue. Just go ahead and hover your cursor over the icon, and you should be able to click on the little ability push adjacent to information technology.

2) Make sure that none of your musical instrument's output meters, or as GarageBand calls them, "Book Sliders," are clipping (going into the red) at any part of the song.
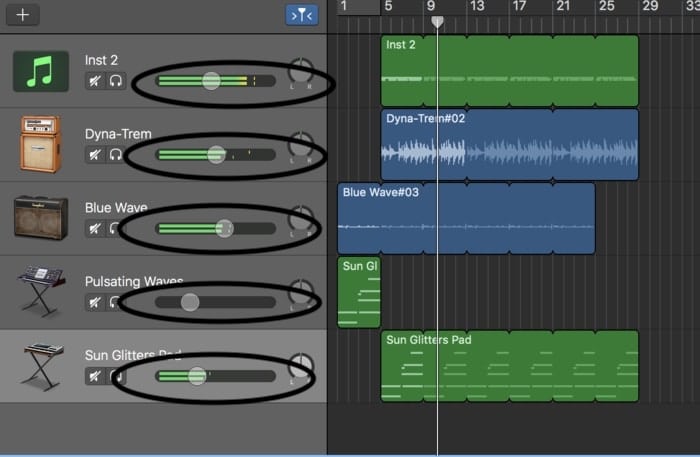
3) Check out your output level – the "Primary Volume Slider" – on the elevation-right-paw side. Brand sure it'south not going into too much into the scarlet.
It's ok if it goes into the red just a little chip in the main "Chief Book Slide," but never in the "Volume Sliders" of your "Sound" and "Software Instrument" tracks.

four) At present that you've done that, become into the tool-bar on the tiptop.
five)Click on "Share."
6) It should bring up the pick, "Export Song To Deejay."
7)Click on that, and then GB volition bring up the tool-bar which you can come across in the epitome below (Make sure your cull, "Uncompressed 16-bit (CD Quality):
8) Later on y'all've exported your vocal to your desktop so yous can drag and driblet it later, open a new projection in GarageBand.
9) Drag and drib your AIFF file back into the GarageBand software underneath the "Software Instrument" or "Audio" track that pops up when you first open a new project.
x)At present, before y'all start messing around with Plug-Ins and the EQ for the mastering process, hitting "Play" on your track, and make sure that the AIFF file that you but imported into GarageBand isn't going into the ruby-red.
You should mind to the whole song once, and sentry the "Book Slider" or the output meter, as some people like to call it.
The output meter on the left-paw side should be hovering in the yellow during the loudest parts of your song, simply.

During the repose parts, information technology's absurd if it sits in the green.
12)I prefer to adjust the Primary Volume Slider on the top correct-mitt-side (not the volume slider) to around +i.4 – 1.8 Dbs.
13)Commonly, a quick mode to get more than book out of your track is to turn on a Compressor in your Plug-In settings. Click on the "Compressor" choice which is usually a default plug-in.

14) Go into the pre-sets by clicking on the pointer, bringing up the "Compressor Tools," and choose, "Platinum Analog Record."

That will boost the volume significantly. I utilise this Plug-In setting pretty much every time because I observe it works great.
xiv)Afterwards you've mixed and mastered your vocal – in a unproblematic process I'll show you how to do later – you can upload it to iTunes, YouTube, or SoundCloud, outlined in the steps in a higher place.
I promise this was helpful for yous. It took me quite a scrap of work to make this, so I'd capeesh it a lot if you shared it on social media.
Later on, I'll be creating a YouTube video, just in example you couldn't figure it out with this stride-past-step process. If anything is unclear, just comment in the section below and I'll help you lot out. Cheers.
YouTube Video Tutorial
How To Upload To Soundcloud, YouTube, and iTunes
baumgartdereddeedly.blogspot.com
Source: https://producersociety.com/how-to-upload/
Postar um comentário for "How to Upload a Sound Recording From Garadeband to Youtube"